Wednesday, January 30, 2013

January Nail Design: YouTube

Hey everyone! So with Valentine's Day coming up in a few weeks I decided I wanted to try a nail art design that was cute and girly but not the traditional red and white heart designs you usually see! So I decided to try water marbling! I have been wanting to try this technique out for a long time now but just never really got around to it!  Here is the original picture/video I looked at.  (I took a screen shot of the YouTube video!)  It was done by cutepolish, a YouTube user who does lots of fabulous nail art tutorial, and the link below the picture takes you to her tutorial on water marbling, which is really helpful!

 
http://www.youtube.com/watch?v=D9A_9FH7e-A&list=UUT8z80a4ESgO2Y4qajk-iXw&index=83
(The above picture and video link are not mine and belong to user cutepolish on YouTube!)

 So I watched cutepolish's water marbling tutorial several times before attempting to try water marbling myself.  As you can see the original picture/video uses primary colors, but as I mentioned before I wanted mine to be Valentine's Day themed so I went with two pinks and a purple.  Here are the polishes I selected:

Polishes from left to right: ULTA "Tutu Cute", OPI "Italian Love Affair", and ULTA "Flamingo".
 
So after selecting my polishes I simply followed cutepolish's steps/directions in her video.  (I suggest you watch her video to really understand how to properly water marble!)  Which to sum it up including filling a small disposable cup with room temperature water (I used tap water since that is all I had!), and then to place tape around each of your nails.  I placed a piece around my finger (and under the front end of my nail) and then placed a second piece right above my nail bed.  It looked like this:
 
 
After that I simply painted a clear coat on my nails, followed by a coat of white nail polish.  For the clear nail polish I used Sally Hansen Xtreme Wear in "Invisible" and for the white nail polish I used Sally Hansen Xtreme Wear in "White On."  Here are my nails right before I started the water marble:


Okay so to water marble you simply drop dots of the nail polish you wish to use into the cup to form a bull's eye and then used a toothpick to create the design of your choice!  You have to work relatively quickly because the polish on the water dries fast!  Once you create your design you simply place your nail down into the water to adhere it to your nail, but BEFORE you remove your nail from the water you need to remove the excess nail polish from the top of the water.  I used Q-tips for that part!  Then you'll need to go ahead and remove the tape from the nail you just water marbled before the polish hardens too much (otherwise it will ruin your polish later).  I used an old set of tweezers to help me and it worked pretty well.  And then last but not least you simply need to clean up around each nail and add a topcoat!  I used Orly's "Sec'NDry" on my nails!  Here are my finished nails!
 
 
As you can see they didn't turn out perfect, but for a first attempt I am pretty happy with them!  Also, as you can probably see, while removing the tape I accidentally smudged my middle finger's nail polish.  I also had a bit of difficulty getting the right temperature for the water so my designs did not come out as clear as cutepolish's did in her YouTube video.  (Which is especially obvious on my pinky finger!)  I think with practice I can fully master the art of water marbling and I plan on trying it again soon!
 
Overall I thought water marbling would be extremely hard but I was pleasantly surprised at how easy it actually was!  I definitely plan on trying water marbling out again soon!
 
Thanks for reading my blog!  :)

Wednesday, January 23, 2013

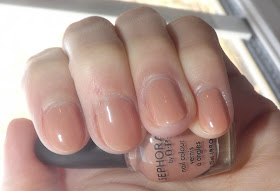
Sephora by OPI "Nonfat Soy Half Caff"


Hey guys!  So this week I decided to break out some new Sephora by OPI polishes I got for Christmas.  My parents ordered me a great 15 polish set of Sephora by OPI nail polishes off of QVC (which in case you aren't American, is a TV channel that sell all sorts of products from cooking equipment to bed to beauty and clothes.)  The set is called "Sephora by OPI Merry & Bright 15-piece Holiday Nail Collection" and can still be purchased at www.qvc.com. The set also includes a limited edition Sephora by OPI nail polish that can only be purchased through this set!  So I really like the set, it has a variety of colors and showcases some of the more popular Sephora by OPI colors.  Here's what the set looks like:


I really do like the set, and the first nail polish I decided to try out is "Nonfat Soy Half Caff" which is this really pretty and dainty pinkish skin color.  It also reminds me of a shell color.  I really like this color and it looks nice on my skin tone, which makes me happy because a lot of nudes I have tried haven't looked good.  Like most of the Sephora by OPI's nail polish I have tried before "Nonfat Soy Half Caff" has a fabulous formula and goes on really easily!  It also was nice to still only need two coats of color to have opaque nails.  Lighter colors sometime streak or require many coats but "Nonfat Soy Half Caff" did not!  Also I was a tad nervous about using the miniature sized bottle because the handle looks so small but actually it worked wonderfully!  As for chipping, I can't really say because I had to work several days in a row and I maimed my nails pretty quickly.  But I know that if I had been kinder to my nails the polish would have lasted longer.

Overall I am really pleased with "Nonfat Soy Half Caff."  I love the color and the quality of polish.  My only regret is that I destroyed the polish at work so quickly.  I would have liked to have been able to wear the polish for longer, but that just means I will have to use it again soon!  :)

Thanks for reading my blog!

Thursday, January 17, 2013

ULTA "The Jungle Look"


Hey guys!  So after last week's 22 store visit looking for Nicole by OPI polishes, which I didn't really find but I did buy 8 new polishes, I went looking through my entire nail polish collecting looking for polish I had never tried before.  And one of the ones I found was ULTA's "The Jungle Look," which is this fabulous green color!  Now I know kelly greens aren't usually a winter color but I just couldn't resist adding a splash of spring to my day!  (I am already ready for summer!)

These ULTA nail polishes retail around $3-$6 a bottle depending on whether it is on sale or not.  And every now and again ULTA puts these polishes on sale for buy one get on free!  (Which is usually when I buy them!)

Okay on the the actual nail polish!  ULTA's "The Jungle Look" is this super pretty kelly green, which I purchased not only for its color but also for its name (based on the Disney movie The Jungle Book!)  "The Jungle Look" goes on really well and has an awesome formula!  You can almost get away with just one coat of polish, but I did two because I always do!  As for chipping "The Jungle Look" held up pretty well for about 4 days, but then I did start to notice small chips appearing at the tips of my nails.  As the week went on the chipping was minimal.  I am very impressed with ULTA's "The Jungle Look."  I love when you can wear a nail polish for a week and see very little chipping!

Overall the ULTA's "The Jungle Look" is a good polish.  It has a great formula, goes on well and has a great green color, and lasted 4 days before chipping, which is always a plus in my book!  I definitely recommend this nail polish!  It is a good quality nail polish at an affordable price!

Thanks for reading my blog!  :)

Saturday, January 12, 2013

OPI "Houston We Have A Purple"


So a couple of weeks ago I ordered my first two jelly polishes on Amazon.  Jelly polishes looked really fun in all the pictures I saw online and I decided I just had to try some out!  I went looking for some OPI jelly polishes and came across the Spring 2011 Texas Collection, which featured several jelly polishes.  I decided to order "Houston We Have A Purple" and "Big Hair... Big Nails," both of which are jellies.

This week I decided to wear "Houston We Have A Purple."  I originally wanted this polish because of its name!  I spent my childhood in Florida and NASA is a huge part of that because whenever a space shuttle launched, as long as you lived on the ocean side of the state, south of NASA (at Cape Canaveral) you could see the shuttle in the air and the big orange booster fall off and drop to the ocean.  Anyway OPI's "Houston We Have A Purple" looks like a deep red purple in the bottle, but turns out to be a lighter berry color on the nail.  I think the change in color from bottle to nail occurs because a jelly polish is made to always look a little less opaque than a cream and jellies are also made to make your nails always look wet and shiny.  And I personally prefer the berry color over the color in the bottle.

As for wear and tear I got "Houston We Have A Purple" to last about 4 days before any major chipping occurred.  However I will admit that the polish probably would have lasted longer if I had gotten more even coats.  Since this was my first time wearing and applying a jelly polish I was unable to get even coats and I had a decent amount of streaking on my nails.  I think with practice nice even coats are possible and that the even coats would mean a longer wear time!

Overall I am very happy with OPI's "Houston We Have A Purple" and I am definitely a fan of jelly polishes now!  I cannot wait to try out the other jelly polish I bought!  And as for chips I think 4 days is pretty good for me, but I really believe that if I had gotten more even coats "Houston We Have A Purple would have probably lasted about 6 days.  (Which is a pretty nice length of time!)

Okay so before I finish this post I just want to mention some new OPI and Nicole by OPI collections that have just been released. 

The first is OPI's Mariah Carey collection, which is featuring OPI's brand new finish "liquid sand."  The collection features 8 colors, 4 liquid sands and 4 non-liquid sands.  I'll admit that I only like the liquid sand colors.  I purchased the mini set of liquid sands at an ULTA for around $13 and I can hardly wait to try them out!

The next two collections are both by Nicole by OPI and they are the Modern Family Collection and the Selena Gomez collection.  Each collection offers 14 colors, which is really exciting!  I have looked at these polishes online and there are several from each collection that I want, but I have not been able to find either of these collections.  I have been to 22 stores (including ULTAs, Wal-Marts, Targets, Sears, CVS', Rite-Aids, Kmart, and a Walgreens) and I have had almost no luck!  Not a single one of the places I went had any of the Selena Gomez collection and only store #19 (an ULTA) and store #21 (a Target) had some of the Modern Family Collection.  And by some I mean they each had only half of the polishes in the collection.  And of the Modern Family collection I did find neither store offered Alex's, Lily's, Manny's, or Jay's colors, which of course are the colors I want.  If you have had any luck finding these two Nicole by OPI collections please let me know where you found them because I would love to know!

Thanks for reading my blog!  :)

Sunday, January 6, 2013

China Glaze "Man Hunt" vs. OPI "Dating A Royal"

So I have been looking through my collection lately for dupes and for the most part I am happy to report that I don't actually own very many!  But I did find two polishes that look identical in the bottle: China Glaze's "Man Hunt" and OPI's "Dating A Royal".  I decided to swatch both of the polishes and find out for sure if the polishes are dupers or not.  As it turns out they are not completely dupes!  But they are very, very similar.


Here's what I found:

China Glaze's "Man Hunt" is slightly darker and richer than OPI's "Dating A Royal" and "Dating A Royal" has a little more of a green tint to it.  Aside from color I also noticed that OPI's "Dating A Royal" was more watery.  After one coat of nail polish it was easy to tell the polish apart based on how well the nail was covered.  Here's what it looked like:


As I started to apply the second coat of OPI I noticed that with two coats of OPI "Dating A Royal" and one coat of China Glaze "Man Hunt" that all three of my nails looked nearly identical.  I decided to snap a photo of this because to me they actually look like real dupes at this stage:


But of course when I wear nail polish (and most bloggers do the same) I always put on two coats of the colored polish I want to wear.  So I then put on a second coat of China Glaze's "Man Hunt."  From here all three of my  nails looked completely opaque but it becomes clear again which nail polish is which.  OPI's "Dating A Royal" almost could use a third coat to make it look nicer, though two coats does cover the nail, while two coats of China Glaze's "Man Hunt"  covers flawlessly.  The watery formula of "Dating A Royal" makes it very hard to get an even coat of polish on your fingers.  Here's the finished product:


Overall both nail polishes are pretty colors and I adore OPI's "Dating A Royal" because of the name and for the wide brush head which does help put the polish on better.  But I do not like the formula of "Dating A Royal" because it causes streaking.  And on the other hand I love China Glaze's "Man Hunt" for it's formula which is prefect and goes on streak free, but I do not like the skinnier brush head that China Glaze uses because it makes it harder to get polish on your nail without needing to re-dip the brush into the bottle halfway through each nail.

Really in the end the color is similar enough, though they are not identical as China Glaze's "Man Hunt" is more of a true royal blue, while OPI's "Dating A Royal" is lighter and has a hint of green in it.  A normal (non-nail polished obsessed person) does not need to own both polishes.  If I had to pick one I would pick China Glaze's "Man Hunt" because of the formula quality.

Also sorry for not touching up my nails to make them look perfect in the photos but they were taken as I went along.  Usually I save the touch ups for the end, but the best picture of the finished nails was one I took before I touched up my nails!

Happy New Year and thanks for reading my blog!  :)